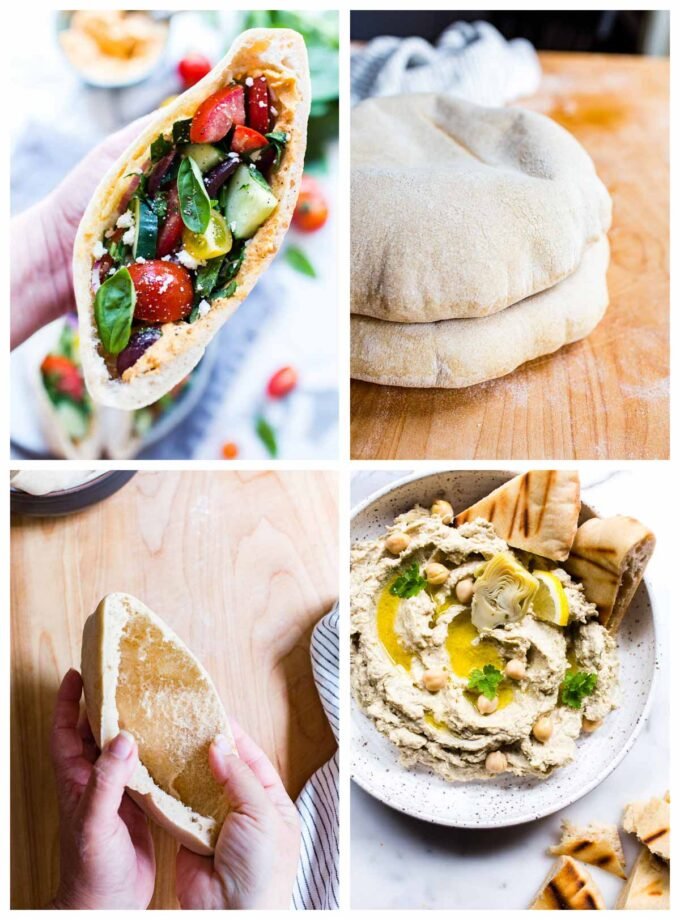
Making fresh bread at home is one of the most comforting tasks you can ever try in your kitchen, and this sourdough discard pita bread recipe is the absolute best place to start your baking journey. Sourdough discard pita bread is a soft, round, flat bread that puffs up nicely during the cooking process to create a hollow pocket right inside the center. This pocket makes the bread ideal for stuffing with fresh vegetables, grilled chicken, hummus, falafel, or any of your favorite sandwich fillings. Instead of throwing away the leftover sourdough starter discard that accumulates during your weekly sourdough feeding routine, this recipe allows you to turn that extra starter into delicious, warm, fluffy flatbreads. You do not need to be an expert baker or have years of experience with sourdough to make this dish turn out wonderful on your very first try. The process combines basic household ingredients with a simple resting period, resulting in a flexible dough that cooks very quickly on a hot skillet or inside a hot oven. By utilizing your extra sourdough discard, you give your flatbread a light, delightful tanginess that pairs seamlessly with all kinds of savory or sweet spreads.
People around the world fall in love with this pita bread recipe for many fantastic reasons, but the main reason is the sheer joy of watching the magic happen right before your eyes. When the thin round disc of dough hits a hot skillet or a preheated baking stone, it transforms from a flat piece of raw dough into a giant, inflated pillow within just two or three minutes. That visual puff is incredibly satisfying to witness and brings genuine excitement into your cooking routine every single time you make a fresh batch. Beyond the fun cooking process, people adore the texture and flavor profile of homemade pitas compared to the dry, stiff options found on grocery store shelves. Store bought flatbreads often crumble easily or feel rubbery, whereas these homemade sourdough discard pitas remain soft, flexible, and tender for days. The subtle sour flavor from the discard elevates the simple flour taste into something truly gourmet without overpowering your final meal. Additionally, home cooks love that this recipe saves money, reduces food waste in the kitchen, and uses clean ingredients that you can easily pronounce and trust.
There are so many wonderful moments and personal reasons to bring this sourdough discard pita bread into your weekly food menu. Emotionally, kneading soft dough with your hands provides a calming, peaceful break from a busy, stressful day, letting you focus on a hands on creative activity that nourishes your household. From a taste perspective, nothing compares to eating a warm piece of flatbread fresh off the skillet, brushed lightly with butter or olive oil and sprinkled with sea salt. If you care about fitness and clean eating, making your own bread gives you complete power over what enters your body, allowing you to avoid artificial preservatives, processed sugars, and excess sodium. This recipe is also perfect for meal prep Sundays, allowing you to cook a big batch of pitas that can be frozen and popped into the toaster during busy work weeks. Whether you are hosting a fun Mediterranean style dinner party for close friends, packing a healthy lunchbox for your kids, or simply trying to live a more sustainable lifestyle by reducing kitchen waste, this bread fits perfectly into every lifestyle.
Starting your home baking adventure can sometimes feel intimidating if you look at complex bread recipes, but this particular pita bread is designed to be completely hassle free and deeply rewarding. Many traditional sourdough recipes require complicated schedules, precise stretch and fold techniques, and long waiting periods that span over multiple days. In contrast, this sourdough discard flatbread recipe gives you fast satisfaction while still delivering all the depth of flavor you expect from fermented dough. You can easily make this dough in the morning and enjoy fresh, warm pitas by lunchtime, making it a very practical option for everyday family cooking. Learning to work with flour and water builds your confidence as a home chef, and this forgiving dough is extremely gentle on beginners who are still learning how dough should feel. Once you taste the amazing difference between a freshly puffed homemade pita and a packaged flatbread, you will find yourself intentionally saving your sourdough discard just so you can make this delicious recipe over and over again.
Ingredients You Will Need
To create these soft and pocket filled sourdough pitas, you only need a few simple kitchen staples. Below is the complete list of ingredients with clear measurements in both metric units and standard kitchen cups.
-
Sourdough Discard: 1 cup or 240 grams (Unfed sourdough starter at room temperature or straight from the refrigerator)
-
All Purpose Flour or Bread Flour: 3 cups or 360 grams (Plus a little extra for dusting your work space)
-
Warm Water: 1 cup or 240 milliliters (Water should feel comfortable to the touch, around 100 degrees Fahrenheit)
-
Instant Active Dry Yeast: 1 teaspoon or 3 grams (This helps guarantee a fast, reliable puff, especially if your discard is cold)
-
Honey or Maple Syrup: 1 tablespoon or 21 grams (Provides a tiny touch of sweetness and helps feed the yeast for a better rise)
-
Extra Virgin Olive Oil: 2 tablespoons or 30 milliliters (Adds richness and makes the final pita soft and flexible)
-
Fine Sea Salt or Table Salt: 1.5 teaspoons or 9 grams (Crucial for enhancing the flavor of the flour and controlling the dough)
Step by Step Method
Follow these easy, clear steps to make perfect sourdough discard pita bread in your own kitchen. Take your time and enjoy each stage of the baking process.
Step 1: Prepare the Liquid Base
In a large mixing bowl, combine the warm water, honey, and instant active dry yeast. Stir gently with a spoon until the honey dissolves into the liquid. Let this mixture sit untouched for about five minutes. You will notice small bubbles forming on top of the water surface, which shows that your yeast is active, alive, and ready to work.
Step 2: Add the Sourdough Discard and Olive Oil
Pour your sourdough discard directly into the bowl with the bubbly water mixture. Add the two tablespoons of extra virgin olive oil. Use a wooden spoon or a silicone spatula to whisk everything together thoroughly. The sourdough discard should break down and blend into the water until you have a milky, smooth liquid.
Step 3: Mix in the Flour and Salt
Add the three cups of all purpose flour and the fine sea salt into the bowl with your liquid mixture. Use a heavy wooden spoon or your hands to stir the flour into the wet ingredients. Keep stirring until all the dry flour is absorbed into the wet dough. At this point, the dough will look a bit shaggy, rough, and sticky, which is completely normal for flatbread dough.
Step 4: Knead the Dough
Dust a clean kitchen counter or cutting board with two tablespoons of flour. Turn your shaggy dough out onto the floured surface. Using the heels of your hands, push the dough forward, fold it back over itself, turn it slightly, and push forward again. Repeat this rhythm of pushing, folding, and turning for six to eight minutes. As you knead, the dough will transform from a sticky mass into a smooth, elastic, and soft ball. If the dough sticks heavily to your hands or the counter, add a tiny sprinkle of extra flour, but avoid adding too much flour so the bread stays soft.
Step 5: Let the Dough Rise
Form your kneaded dough into a neat, round ball. Lightly grease your large mixing bowl with a tiny drop of olive oil. Place the dough ball inside the greased bowl and turn it around once so the surface of the dough is lightly coated with oil. Cover the bowl tightly with a clean kitchen towel or plastic wrap. Place the bowl in a warm, draft free spot in your kitchen for about one to two hours. The dough is ready when it has expanded significantly in size and feels light and airy when poked gently.
Step 6: Divide the Dough into Equal Pieces
Gently press down on the center of the risen dough to release the air bubbles inside. Transfer the dough onto your counter. Use a bench scraper or a sharp kitchen knife to cut the dough into eight equal portions. If you want to use a kitchen scale for exact accuracy, each portion should weigh around 100 grams. Roll each portion between your palms to form eight smooth, round dough balls. Cover these dough balls loosely with a damp towel and let them rest on the counter for fifteen minutes. This short rest allows the gluten to relax, making the dough much easier to roll out flat.
Step 7: Roll Out the Pita Discs
Take one dough ball at a time, keeping the remaining balls covered so they do not dry out. Lightly flour your counter and your rolling pin. Roll the dough ball into a flat round circle that is about six to seven inches wide and about one quarter of an inch thick. Try your best to keep the circle even in thickness all the way around, because an even thickness helps the pita puff up correctly when cooked. Avoid poking holes or tearing the dough, as any hole will allow steam to escape and stop the pocket from forming.
Step 8: Cook the Pita Bread
You can cook your pitas using either a stove top skillet or your home oven. Both methods work wonderfully.
Method A: Stove Top Skillet (Recommended for Beginners)
Place a heavy cast iron skillet or a stainless steel pan on your stove over medium high heat. Let the pan get very hot for at least three to five minutes before cooking. Do not add oil to the pan. Place one rolled dough disc directly onto the hot, dry skillet. Cook for about thirty seconds until small bubbles appear on top. Flip the pita over and cook the second side for one to two minutes until light brown spots form underneath. Flip the pita back over to the first side. Within seconds, the dough should inflate like a balloon! Let it puff fully, cook for another thirty seconds, and then remove it from the heat.
Method B: Oven Baking
Preheat your oven to 475 degrees Fahrenheit (245 degrees Celsius). If you have a baking stone or a heavy baking sheet, place it on the middle rack of the oven while it preheats so it gets piping hot. Carefully place two or three rolled dough discs onto the hot baking stone or sheet. Bake for three to five minutes. The pitas will puff up completely in the high heat of the oven. Once inflated and lightly golden, remove them carefully using tongs.
Step 9: Cool and Wrap
Place your freshly cooked, hot pitas onto a clean kitchen towel and wrap them up loosely. Wrapping the hot pitas traps the gentle steam, which softens the outer crust and keeps your pita bread ultra pliable, soft, and easy to fold or stuff.
Why This Recipe Is Special
This sourdough discard pita bread recipe holds a very special place in home baking because it successfully combines incredible convenience with real artisan quality. Traditional sourdough bread making often demands precise schedules, long fermentation periods, and advanced techniques like autolyse and coil folds. In comparison, this flatbread recipe takes all the stress away while still allowing you to reap the rewards of using sourdough culture in your kitchen. It gives you an immediate outlet for your surplus sourdough discard, turning what would normally be food waste into delicious, high quality food for your family.
From a nutritional standpoint, this recipe offers clear advantages over standard commercial breads. When sourdough discard rests in the dough, the natural wild bacteria and yeast break down complex starches and phytic acid found in grain. This gentle fermentation process makes the final bread much easier on your digestive system, allowing your body to absorb essential minerals like magnesium, zinc, and iron more efficiently. Furthermore, this recipe contains zero artificial emulsifiers, zero commercial dough conditioners, and zero chemical preservatives. You are eating pure, simple food made from basic ingredients that nourish your body naturally.
The flavor profile of these pitas is another reason why this recipe stands out as truly extraordinary. The sourdough discard imparts a delicate, complex sour note that perfectly balances the rich flavor of olive oil and the mild sweetness of honey. Instead of a flat, boring flour taste, every bite delivers a rich depth of flavor that complements both sweet toppings like honey and peanut butter as well as savory toppings like garlic paste, roasted meat, and tangy dips. The contrast between the tender outer crust and the airy interior pocket creates an amazing eating experience every time.
+-------------------------------------------------------------------------+
|                    Key Highlights of Homemade Pita                      |
+-------------------------------------------------------------------------+
| * Zero Food Waste: Uses leftover sourdough starter productively         |
| * Simple Digestion: Natural fermentation breaks down complex starches   |
| * Clean Ingredients: Free from store bought additives and preservatives |
| * Fast Cooking: Puffs up in under three minutes on a hot skillet        |
+-------------------------------------------------------------------------+
Extra Tips for Better Taste
-
Brushing with Garlic Herb Butter: The moment your pita comes off the hot skillet, brush the top surface with melted butter mixed with finely minced garlic, fresh parsley, and a pinch of salt. The heat absorbs the fresh garlic flavor instantly.
-
Adding Whole Seeds to the Dough: Sprinkle sesame seeds, nigella seeds, or flax seeds onto the dough disc right before you finish rolling it out. Press gently with your rolling pin so the seeds adhere firmly to the surface before cooking.
-
Controlling the Skillet Temperature: Maintaining high heat is the secret to getting a massive puff. If your flatbread is taking more than two minutes to show bubbles, your pan is too cool. Increase the heat so steam forms rapidly inside the dough disc.
-
Using Zaatar Spice Blend: Brush your cooked pita with fresh extra virgin olive oil and sprinkle a generous amount of zaatar spice blend over the top for an authentic Middle Eastern flavor profile.
-
Keeping Pitas Soft for Days: Always stack your cooked flatbreads on top of each other inside a clean, wrapped cotton cloth while they cool down. The warm moisture softens the dough skin and prevents the edges from hardening into crackers.
-
Proper Reheating Technique: To reheat leftover cold pitas, splash a few drops of water on both sides and warm them up in a dry skillet for thirty seconds on each side. They will regain their soft, fluffy texture instantly.
Final Thoughts
Baking your own sourdough discard pita bread at home is a fun, deeply satisfying experience that brings huge rewards for very little effort. With just a handful of simple ingredients and a warm skillet, you can transform simple kitchen leftovers into soft, pocket filled flatbreads that put store bought options to shame. Whether you choose to fill them with fresh Mediterranean ingredients, use them to scoop up flavorful soups, or simply enjoy them warm with a spread of rich butter, this easy recipe is guaranteed to become a loved staple in your home kitchen routine.
Nutrition Details
Below is the estimated nutrition breakdown per serving for one individual sourdough discard pita bread based on a total yield of eight pitas.
Per Serving Nutrition Table
| Nutritional Component | Amount Per Pita Serving | Percentage of Daily Value |
| Calories | 210 Calories | 10 Percent |
| Total Carbohydrates | 38 Grams | 14 Percent |
| Dietary Fiber | 2 Grams | 7 Percent |
| Sugars | 2 Grams | 2 Percent |
| Protein | 6 Grams | 12 Percent |
| Total Fat | 4 Grams | 5 Percent |
| Saturated Fat | 0.5 Grams | 3 Percent |
| Sodium | 440 Milligrams | 19 Percent |
| Potassium | 75 Milligrams | 2 Percent |
| Calcium | 15 Milligrams | 1 Percent |
| Iron | 2.2 Milligrams | 12 Percent |
Nutritional Comparison Overview
-
Homemade Sourdough Pita: Made with clean extra virgin olive oil, simple honey, natural sourdough culture, zero artificial preservatives, lower glycemic load due to natural fermentation.
-
Store Bought Commercial Pita: Often contains refined vegetable oils, high fructose corn syrup, calcium propionate, potassium sorbate, dough conditioners, and higher sodium levels to extend shelf life.
Disclaimer
Everyone’s body is different and individual health results may change depending on your personal medical history, metabolic rate, allergies, and daily dietary requirements. The nutritional values provided in this article are general estimates meant for educational and informational purposes only. If you have specific dietary restrictions, gluten sensitivities, or underlying medical conditions, please consult with a qualified doctor or registered dietitian before making significant changes to your regular meal plan.