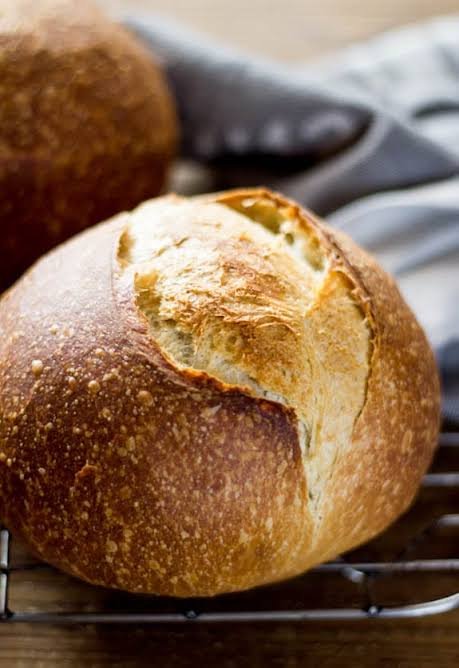
Making fresh bread at home is one of the most rewarding kitchen experiences you can ever have. This simple sourdough recipe is designed specifically to help beginners master the art of natural baking without feeling overwhelmed by complex techniques or confusing terms. Sourdough bread relies entirely on natural wild yeast and friendly bacteria rather than commercial packet yeast to rise. This traditional method produces a loaf with a deep flavor profile, a golden crispy crust, and a delightfully chewy soft interior filled with beautiful air pockets. Cooking this way connects you directly to ancient culinary traditions that have nourished families for thousands of years. You do not need any special professional bakery equipment or advanced culinary training to make this delicious loaf right in your own home kitchen. Everything about this process is designed to be accessible, relaxed, and deeply satisfying for home cooks of all skill levels.
People all around the world fall in love with sourdough bread because the taste and texture are vastly superior to any standard store bought loaf. The natural fermentation process creates a gentle tangy flavor that perfectly balances the rich nuttiness of whole grains. Every single slice offers a wonderful contrast between the crackling outer shell and the pillowy soft center that holds butter or jam effortlessly. Beyond the incredible taste, people adore the slow process of watching simple flour and water transform into a living dough that grows and shapes itself over time. Baking sourdough becomes a soothing creative hobby that allows you to slow down and focus on something tactile and wholesome. Serving a warm slice of fresh homemade bread to your family or friends creates an instant sense of comfort and celebration that commercial bread simply can never match.
This recipe is the perfect choice whether you want to nourish your body with healthier food or simply enjoy a relaxing weekend baking project. Sourdough is wonderful for fitness enthusiasts and health conscious individuals because the natural fermentation breaks down gluten and phytic acid, making the nutrients much easier for your body to digest. It provides long lasting steady energy without causing sudden sharp spikes in your blood sugar levels. Beyond physical health benefits, baking this loaf is an ideal activity for quiet Sunday mornings when you want your home to smell like a cozy bakery. It is also an extraordinary food to share during family dinners, holiday gatherings, or as a thoughtful handcrafted gift for neighbors and friends. Taking time to nurture your dough offers a peaceful break from busy modern lives, giving you a tangible reward you can taste and share.
Starting your journey into natural bread baking requires only patience and a few basic pantry staples that you likely already own. The beauty of this recipe lies in its extreme simplicity, relying on basic science rather than synthetic additions or complicated steps. As you practice this recipe, you will quickly develop an intuitive feel for how dough behaves under different temperatures and moisture levels. You will learn to recognize when the dough is properly fermented simply by touching it, smelling its sweet sour aroma, and watching how it bounces back. This master recipe yields a reliable loaf every single time, giving you the confidence to turn simple flour into an impressive centerpiece for your kitchen table. Once you experience the smell of this bread fresh out of your oven, you will never want to go back to processed factory loaves again.
Ingredients You Will Need
-
Active sourdough starter that is fully fed and bubbly, 100 grams
-
Warm clean water around body temperature, 375 grams
-
Unbleached bread flour or high protein white flour, 500 grams
-
Fine sea salt or unrefined mineral salt, 10 grams
Step by Step Method
-
Mixing the dough base begins by taking a large clean mixing bowl and placing it on a digital scale. Pour in 100 grams of your active bubbly starter along with 375 grams of warm water. Use a wooden spoon or your fingers to gently stir the starter and water together until the mixture looks milky and slightly foamy on top.
-
Add 500 grams of unbleached bread flour directly into the wet starter mixture. Use a sturdy spatula or a dough whisk to combine the flour and liquid thoroughly. Keep mixing until all the dry flour is fully absorbed and a shaggy rough dough forms with no dry spots remaining. Cover the bowl with a clean damp kitchen towel and let it rest undisturbed on your counter for 30 minutes so the flour can fully absorb the water.
-
Sprinkle 10 grams of fine sea salt evenly over the top of your rested dough. Add a few drops of fresh water to help the salt dissolve easily. Wet your clean hands slightly to prevent sticking, then pinch and squeeze the salt into the dough until it feels completely incorporated.
-
Instead of traditional heavy kneading, you will use a gentle stretch and fold method to build strength in the dough. Reach down to the bottom of the bowl, grab one edge of the dough, stretch it upwards gently, and fold it over the top toward the center. Rotate the bowl a quarter turn and repeat this stretching action on all four sides of the dough. Cover the bowl again and let it rest for 30 minutes. Repeat this complete stretch and fold process three more times over the next two hours, resting the dough for 30 minutes between each set.
-
After finishing four sets of stretches and folds, allow the dough to rest at room temperature for its main bulk fermentation phase. Cover the bowl tightly with plastic wrap or a wet cloth. Let the dough rise undisturbed for about 4 to 6 hours depending on how warm your kitchen is. The dough is ready for the next step when it has increased in size by roughly 50 percent, feels airy, and shows small bubbles under the smooth top surface.
-
Lightly dust your work surface with a small amount of flour. Gently tip the puffy dough out of the bowl onto the surface without forcing or deflating it roughly. Gently pull the edges of the dough outward to form a loose flat round shape. Fold the left side into the middle, then fold the right side over the left like a letter. Roll the dough up tightly from top to bottom into a smooth ball. Use your hands to pull the ball toward yourself across the counter to build tension on the outer skin of the dough.
-
Line a medium round basket or a deep mixing bowl with a clean cotton kitchen towel. Dust the inside of the towel heavily with rice flour or bread flour to prevent the wet dough from sticking. Use a bench scraper or your hands to lift the shaped dough ball carefully and place it seam side up into the lined basket.
-
Cover the top of the basket with a plastic bag or towel. Place the basket inside your refrigerator for a cold proofing period lasting between 8 and 16 hours. This slow cold sleep helps build complex sour flavors and makes the dough firm enough to score and bake easily the next morning.
-
Place a large heavy Dutch oven pot with its lid inside your oven. Preheat your oven to 230 degrees Celsius or 450 degrees Fahrenheit for at least 45 minutes so the heavy pot becomes piping hot.
-
Remove your chilled dough directly from the refrigerator. Cut a square piece of parchment paper and place it over the top of the basket. Flip the basket upside down so the dough rests smoothly on top of the paper. Use a sharp razor blade or a very sharp knife to cut a shallow slanting slash across the top of the dough. This score allows steam to escape so the bread expands upwards neatly while baking.
-
Carefully remove the hot Dutch oven from your main oven using heavy oven mitts. Use the parchment paper edges as handles to gently lower the scored dough into the center of the pot. Place the lid securely on top of the pot and return it to the hot oven immediately.
-
Bake covered with the lid on for 20 minutes. The trapped steam inside the pot will build a crisp thin crust and help the bread rise tall. After 20 minutes, carefully remove the lid to reveal the expanded loaf. Lower the oven temperature to 215 degrees Celsius or 420 degrees Fahrenheit and bake uncovered for another 20 to 25 minutes until the crust turns a rich deep golden brown color.
-
Take the hot bread out of the pot and place it onto a wire cooling rack. Allow the loaf to cool down completely at room temperature for at least two full hours before slicing. Cutting into warm bread traps steam inside, making the interior gummy, so letting it cool fully guarantees the best crumb structure.
Why This Recipe Is Special
This sourdough recipe stands out because it completely removes the need for commercial additives, preservatives, or artificial enhancers commonly found in store loaves. The naturally long fermentation process breaks down tough proteins, making it exceptionally kind to your digestive system. Many people who feel bloated after eating standard commercial bread find that proper wild sourdough causes no discomfort at all. The presence of natural beneficial acids lowers the glycemic index of the final loaf, helping to keep your energy levels steady throughout the entire day without sudden tiredness.
From a culinary perspective, the depth of flavor created by wild yeast cannot be matched by quick rising modern methods. Every single loaf carries a rich profile that combines buttery earthy notes with a pleasing tang. The double baking technique using a covered pot traps natural steam, creating an irresistible contrast between the thick crackling outer crust and the soft airy interior. Because this recipe relies on basic simple steps rather than precise complex machinery, it builds genuine baking confidence that empowers you to create artisan quality food using just three basic ingredients.
Extra Tips for Better Taste
-
Use filtered water or let tap water sit out uncovered overnight so chlorine evaporates, as chlorine can slow down wild yeast growth.
-
Mix a small portion of whole wheat or rye flour into your white bread flour to add rich nutty flavor undertones to your bread.
-
Maintain a warm resting environment around 24 to 26 degrees Celsius during bulk fermentation to help your dough rise predictably.
-
Dust your towel with rice flour instead of wheat flour because rice flour contains no gluten and will never stick to wet dough.
-
Add fresh chopped rosemary, roasted garlic, or grated cheddar cheese during the final folding step for an exciting flavor variation.
-
Place an extra baking sheet on the bottom rack of your oven if the bottom crust of your loaf tends to get too dark or burn.
-
Slice your completely cooled loaf and freeze the individual slices in a sealed bag so you can toast fresh sourdough whenever you want.
Final Thoughts
Baking sourdough bread at home is a deeply satisfying journey that blends simple practical science with comforting kitchen craft. Do not worry if your very first loaf is not picture perfect, because even imperfect sourdough tastes delicious when toasted with fresh butter. With a bit of practice, you will quickly master the simple rhythm of mixing, folding, and baking your own custom loaves. Enjoy every step of the process, embrace the rich aromas filling your home, and take pride in feeding yourself and your loved ones genuine handmade food.
Nutrition Details
| Nutrient Component | Per Serving Amount | Per Whole Loaf Amount |
| Total Calories | 165 kcal | 1650 kcal |
| Carbohydrates | 34 grams | 340 grams |
| Dietary Fiber | 2 grams | 20 grams |
| Protein | 6 grams | 60 grams |
| Total Fat | 0.5 grams | 5 grams |
| Saturated Fat | 0.1 grams | 1 gram |
| Sodium | 380 milligrams | 3800 milligrams |
| Potassium | 65 milligrams | 650 milligrams |
| Iron | 1.2 milligrams | 12 milligrams |
Disclaimer
Everyone’s body and health needs are unique, so individual experiences with food and digestion can vary from person to person. While many people find naturally fermented sourdough easier to digest than ordinary bread, this recipe still contains natural wheat gluten and is not suitable for individuals with celiac disease. Nutritional values provided in this article are general estimates based on standard flour types and standard portion sizes. Actual nutrient numbers may change depending on the specific flour brands, fermentation times, and serving sizes you use in your own home kitchen.