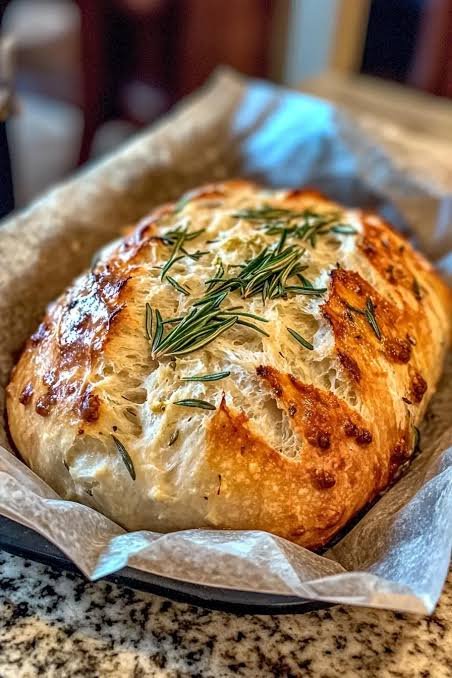
Freshly baked bread brings a feeling of comfort that few other foods can match. This simple recipe for rustic no knead rosemary garlic bread is created for anyone who wants high quality artisan bread without spending hours in the kitchen. Traditional bread recipes often require intense physical effort, long mixing sessions, and precise shaping skills that intimidate beginner cooks. This recipe changes everything by relying on time and natural fermentation rather than physical labor to build structure and deep flavor. When you mix flour, water, yeast, salt, fresh rosemary, and fragrant garlic together, a quiet magic happens overnight. The wet dough slowly expands and develops a rich flavor profile that rivals any professional bakery loaf. You do not need expensive kitchen gear, special stands, or years of practice to master this process. Everything comes together in one large mixing bowl with a simple spoon or spatula. The final result is a beautiful round loaf featuring a deep golden crust and a soft tender crumb inside.
People all around the world fall in love with this bread because it offers incredible gourmet quality with minimal effort. Beginners often feel nervous about working with yeast, but this approach takes away all the stress and guessing. Because there is no intense kneading required, you cannot overwork the dough or ruin the soft interior texture. The combination of fresh rosemary leaves and roasted minced garlic creates an incredible aroma that fills your whole home while baking. The garlic becomes soft and sweet during the bake, while the rosemary adds a fresh botanical earthy note. The outer crust bakes to a satisfying crisp crunch while the inside stays fluffy, chewy, and rich with moisture. Friends and family will think you spent all morning working at an authentic Italian bakery when they sample your creation. It brings immense joy to serve something so warm, handsome, and flavorful that you created entirely with your own hands.
There are countless reasons and special moments that call for baking a fresh loaf of homemade bread. Baking can be a wonderful warm emotional activity on a cozy quiet rainy weekend when you want your home to feel inviting and comfortable. It is also an ideal addition to family dinners, quiet holiday meals, pasta nights, or relaxed evening parties with good friends. From a nutritional perspective, making your own bread gives you complete control over every single ingredient entering your body. Commercial store bought breads frequently contain unnecessary preservatives, artificial chemicals, excess sugars, and hidden oils that decrease quality. This homemade recipe uses clean simple wholesome ingredients that nourish your body while satisfying your warm carbohydrate cravings. Sharing hot fresh bread sliced open with real butter or rich olive oil creates pure happiness at the dining table. It brings people together and makes any basic weeknight dinner feel like a celebrated special occasion.
Starting your baking journey with this foolproof recipe builds immense confidence in the kitchen while soothing your daily stress. The physical action of combining simple ingredients and watching them transform overnight provides a grounded meditative sense of accomplishment. You do not need to worry about rigid timing or complex temperature monitoring because yeast works gently at its own natural pace. As the bread bakes inside a hot covered Dutch oven, the trapped steam produces a crackly golden outer surface that shatters beautifully under a bread knife. Each slice delivers a comforting mix of warm garlic flavor, aromatic fresh herbs, and soft sourdough like air pockets. Whether you enjoy fitness focused eating, simple homemade comfort foods, or entertaining guest gatherings, this loaf fits smoothly into your lifestyle. Once you slice into your very first fresh golden loaf, you will realize how easy artisan home baking can truly be.
Ingredients You Will Need
To create this delicious loaf, gather the following simple ingredients with exact measurements.
All purpose flour or bread flour: 4 cups or 500 grams
Warm water around 100 degrees Fahrenheit: 1 and 1/2 cups or 360 milliliters
Instant dry yeast or active dry yeast: 1 teaspoon or 3 grams
Fine sea salt or table salt: 1 and 1/2 teaspoons or 9 grams
Fresh rosemary leaves finely chopped: 2 tablespoons or 6 grams
Garlic cloves peeled and minced: 4 cloves or 12 grams
Extra virgin olive oil for coating the bowl: 1 tablespoon or 15 milliliters
Cornmeal or extra flour for dusting the baking surface: 2 tablespoons or 15 grams
Step by Step Method
Step 1: Preparing the Garlic and Herb Mixture Take your fresh rosemary sprigs and pull the leaves off the tough stems. Chop the leaves finely using a sharp kitchen knife until you have two full tablespoons. Next, peel your garlic cloves and mince them very small so they distribute evenly throughout the dough. If you prefer a milder sweet garlic taste, you can gently cook the minced garlic in a small pan with a drop of olive oil for two minutes until light golden, then let it cool completely.
Step 2: Mixing the Dry Ingredients In a large mixing bowl, combine the flour, dry yeast, fine sea salt, and chopped fresh rosemary. Use a whisk or a large spoon to mix these dry components together for about thirty seconds. Ensuring the salt and yeast are well distributed through the flour prevents concentrated pockets of salt which could slow yeast growth.
Step 3: Adding the Water and Garlic Pour the warm water and the minced garlic into the bowl with the dry mixture. Use a sturdy wooden spoon or a silicone spatula to stir everything together gently. Keep stirring until all the dry flour disappears and a wet shaggy sticky dough forms. This should take about one to two minutes. Do not worry if the dough looks rough or loose. It is supposed to look wet and messy at this stage.
Step 4: The Long Slow Rising Process Cover the top of your mixing bowl tightly with plastic wrap or a clean damp kitchen towel. Place the bowl in a warm draft free spot in your kitchen. Allow the dough to rest undisturbed for at least twelve hours, or up to eighteen hours at room temperature. During this long slow rise, bubbles will form across the surface and the dough will double or triple in size while developing wonderful flavor.
Step 5: Preheating the Oven and Dutch Oven When your long rising period is complete, place a heavy iron Dutch oven with its lid inside your cold oven. Preheat your oven to 450 degrees Fahrenheit or 230 degrees Celsius. Let the covered pot heat inside the hot oven for at least thirty minutes. This high heat is essential for creating a crispy golden crust and giving your loaf a dramatic rise.
Step 6: Shaping the Soft Dough While your oven and pot are preheating, lightly flour your kitchen counter or a large piece of parchment paper. Gently scrape the sticky wet dough out of the bowl onto the floured surface. Using floured hands, gently fold the edges of the dough toward the center two or three times to form a smooth round ball shape. Flip the dough ball over so the smooth top side faces upward. Cover it loosely with a towel and let it rest for twenty minutes while the pot finishes heating.
Step 7: Baking with Steam Carefully remove the hot Dutch oven from your preheated oven using thick dry oven mitts and set it on a heat safe surface. Take off the hot lid. Lift your shaped dough ball using the parchment paper underneath it and carefully lower the paper and dough into the center of the scorching hot pot. Place the lid back on the Dutch oven tightly. Return the pot to the oven and bake covered for thirty minutes. The covered pot traps steam from the wet dough, creating the perfect crispy outer shell.
Step 8: Uncovering for a Golden Finish After thirty minutes, carefully remove the lid from your Dutch oven. You will see that the loaf has expanded and turned pale golden. Leave the pot uncovered in the oven and bake for an additional fifteen to twenty minutes. This uncovered time allows the crust to develop a deep golden brown shade and a firm crunchy texture while roasting the garlic notes on top.
Step 9: Cooling the Bread Remove the Dutch oven from your oven and carefully lift the baked bread out using the edges of the parchment paper. Place the hot loaf onto a wire cooling rack. Allow the bread to cool completely for at least forty five minutes before slicing. Cutting into hot bread too early traps moisture and can make the inside texture dense or gummy. Once cooled, slice with a serrated bread knife and enjoy.
Why This Recipe Is Special
This rustic rosemary garlic loaf stands out for many wonderful reasons. First, the complete removal of manual kneading makes it accessible to everyone regardless of cooking experience or physical strength. Traditional bread making can cause arm strain and requires careful temperature monitoring, but this slow fermentation method lets time do all the heavy lifting. The long fermentation process breaks down complex starches in the flour, making the finished bread much easier to digest for many people compared to fast commercial loaves.
Second, the health profile of this homemade loaf is superior to standard store bought bread options. You are using basic clean ingredients without added high fructose corn syrup, artificial dough conditioners, synthetic colors, or chemical preservatives. Garlic is well known for its natural immune boosting properties and cardiovascular benefits, while fresh rosemary provides powerful anti inflammatory antioxidants. Using real olive oil adds healthy heart friendly monounsaturated fats into your daily diet.
Finally, the flavor and texture profile is simply outstanding. The high hydration level creates large glossy air pockets throughout the crumb, giving each bite a bouncy chewy feel. The combination of pungent savory garlic and aromatic piney rosemary offers a luxurious restaurant level taste experience at home. The high heat of the Dutch oven creates an incredible golden crust that crackles pleasantly when sliced, offering a ideal balance between crunchy exterior and delicate soft interior.
Extra Tips for Better Taste
To take your bread to an even higher level of deliciousness, try roasting whole garlic heads in the oven before adding them to your dough. Roasted garlic becomes silky smooth and sweet, providing a mellow buttery flavor that blends seamlessly into the crumb without any sharp bite.
You can also experiment with different specialty salts. Dusting the wet top of your shaped dough with coarse flake sea salt or Maldon salt right before baking adds a bright salty crunch to every slice of golden crust.
If you enjoy a bit of warmth, add half a teaspoon of crushed red pepper flakes along with the dry herbs. The combination of gentle spice, sweet garlic, and earthy rosemary creates a amazing flavor depth that pairs perfectly with warm tomato soups and pasta dishes.
Another fantastic idea is substituting a portion of the water with mild dark beer or sparkling water. The carbonation and natural yeasts present in these beverages enhance the rising power and add a delicate malty complexity to the crumb.
For cheese lovers, folding half a cup of cubed sharp cheddar, aged parmesan, or smoked provolone into the dough during the final shaping step creates melted gooey pockets of cheesy goodness scattered throughout the entire loaf.
Final Thoughts
Baking your own rustic no knead rosemary garlic bread is one of the most fulfilling culinary tasks you can accomplish in your home kitchen. It proves that creating high quality gourmet food does not require complex equipment, expensive ingredients, or advanced professional techniques. With simple ingredients, a little patience, and a hot oven, you can transform basic kitchen staples into an impressive, delicious, and healthy loaf of bread. The marvelous aroma of baking garlic and herbs will warm your home and bring smiles to everyone around your dining table. Give this effortless recipe a try this week, and welcome the joy of authentic home baking into your everyday life.
Nutrition Details
Below is the estimated nutritional breakdown for the full recipe loaf as well as per individual serving slice. This recipe yields approximately ten equal slices.
Total Recipe Nutrition Values: Calories: 1950 kilocalories Carbohydrates: 380 grams Protein: 52 grams Fat: 18 grams Saturated Fat: 2.5 grams Fiber: 18 grams Sugar: 6 grams Sodium: 3500 milligrams
Per Serving Nutrition Values based on 10 slices: Calories: 195 kilocalories Carbohydrates: 38 grams Protein: 5.2 grams Fat: 1.8 grams Saturated Fat: 0.25 grams Fiber: 1.8 grams Sugar: 0.6 grams Sodium: 350 milligrams
Disclaimer
This recipe and its nutritional information are provided for general educational and inspirational purposes only. Individual nutritional needs, dietary restrictions, and health conditions vary from person to person. The calculated values are estimations based on standard ingredient databases and may change based on specific ingredient brands or exact portion sizes used. Always consult with a qualified healthcare professional or certified dietitian for personalized dietary advice.