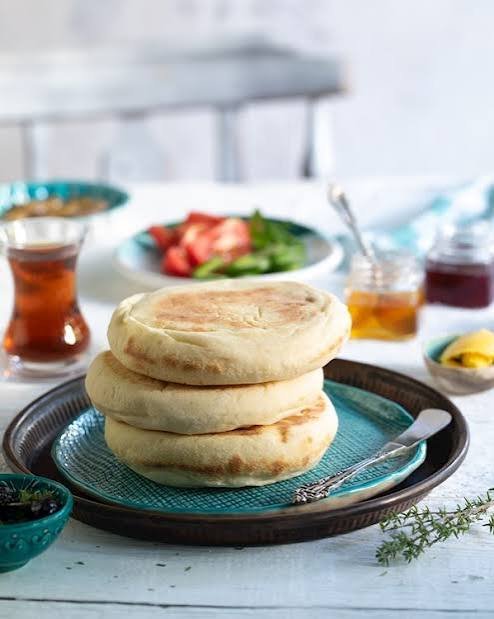
Bazlama is a wonderful traditional flatbread that comes from the rich and colorful culinary heritage of Turkey. This legendary bread has been baked in home kitchens and village ovens for generations and continues to hold a very special place on breakfast tables across the globe. When you look at a freshly cooked piece of this flatbread, you will instantly notice its signature soft texture, gentle golden brown spots, and impressive pillowy fluffiness that sets it apart from ordinary flatbreads. It is thick enough to hold plenty of delicious fillings yet soft enough to melt in your mouth with every single bite. The magic of this dish lies in its sheer simplicity because it relies on basic kitchen ingredients that almost everyone already has sitting in their pantry today. The simple combination of flour, water, yeast, yogurt, salt, and a little sugar comes together to create a light dough that transforms into pure comfort food once it hits a hot cooking surface. Learning how to prepare this bread in your own kitchen brings a wonderful touch of Mediterranean warmth right into your home.
People around the world absolute love this traditional bread for so many fantastic reasons, but the main factor is its incredible texture and rich taste. Unlike dry or tough flatbreads that tear easily, this pan bread stays soft and tender for hours after cooking because of the special inclusion of yogurt in the dough mixture. Yogurt acts as a natural tenderizer that keeps the gluten delicate and locks in a huge amount of natural moisture throughout the entire cooking process. When you rip off a piece of warm bread, the steam rises gently, carrying a comforting aroma of toasted grain and fresh homemade yeast. Food lovers also adore how incredibly versatile this flatbread can be during mealtime because it pairs effortlessly with both savory dishes and sweet spreads. You can slather it with creamy butter, stuff it with melted cheese and fresh herbs, or use it to scoop up rich spicy stews during dinner time with your family. The joy of watching the dough swell up like a giant soft pillow in a hot skillet is deeply satisfying for cooks of all skill levels.
There are countless great reasons and memorable occasions to make this special recipe at home, whether you are cooking for health, emotion, or pure enjoyment. From an emotional perspective, baking fresh bread fills your entire house with a cozy, welcoming scent that instantly makes any standard day feel like a joyous holiday morning. It brings families together in the kitchen as everyone eagerly waits for the hot pieces of bread to come off the skillet so they can brush them with garlic butter. If you care about fitness and nutrition, making your own flatbread allows you to take total control over every single ingredient entering your body. Commercial store bought breads are often packed with artificial preservatives, excessive sodium, hydrogenated oils, and unnecessary chemical additives that can cause inflammation or heavy bloating. By crafting your bread from scratch, you ensure that you are eating pure, wholesome nutrition made from clean ingredients that nourish your body properly and keep your energy stable throughout the day.
Making this traditional recipe is also a wonderful way to slow down, reduce daily stress, and enjoy the calming art of mindful cooking in your busy life. The tactile process of working with gentle yeast dough, feeling its soft texture under your palms, and watching it rise naturally gives a great sense of mental relaxation. It serves as a perfect cooking project for quiet weekend mornings when you want to treat your family to a slow, luxurious breakfast feast with fresh tea, olives, feta cheese, and cucumber slices. It is also an absolute lifesaver for busy weeknights because you can prepare the dough in advance and cook fresh pieces in just a few short minutes on top of your stove. Whether you want to impress dinner guests at a weekend party or simply want to pack a clean, healthy wrap for your work lunch, this traditional pan bread fits perfectly into every lifestyle. Once you master this simple dough, you will likely stop buying store bought bread altogether because nothing compares to the fresh taste of homemade flatbread cooked in your own skillet.
Ingredients You Will Need
To prepare this rich and delicious flatbread, collect all the following ingredients in your kitchen:
-
4 cups of all purpose flour or unbleached bread flour
-
1 tablespoon of instant dry yeast or active dry yeast
-
1 tablespoon of granulated white sugar
-
1 teaspoon of fine sea salt or table salt
-
1 cup of lukewarm warm water around 100 degrees Fahrenheit
-
1 cup of plain warm milk
-
3 tablespoons of plain whole milk Greek yogurt at room temperature
-
2 tablespoons of extra virgin olive oil
-
2 tablespoons of melted unsalted butter for brushing on top after cooking
-
2 tablespoons of freshly chopped parsley for optional garnish
Step by Step Method
Preparing the Yeast Mixture
Take a large mixing bowl and add the warm water together with the warm milk. Make sure the liquids are comfortable to touch and not too hot because high heat can easily destroy the live yeast cells. Add the granulated white sugar and the dry yeast into the warm liquid mixture. Stir everything gently with a wooden spoon until the sugar and yeast dissolve completely. Let this mixture sit untouched on your kitchen counter for about seven to ten minutes until you see a frothy foam form on top of the liquid. This foaming reaction shows that your yeast is alive, active, and ready to make your dough rise beautifully.
Mixing the Dough Components
Once your yeast mixture is frothy and active, add the plain yogurt and the extra virgin olive oil into the same bowl. Whisk these wet ingredients together until the liquid looks smooth and completely even. In a separate bowl, combine your flour and sea salt together so the salt is evenly distributed. Slowly add the flour mixture into your wet yeast mixture, about one cup at a time. Stir gently with a heavy wooden spoon after each addition until a shaggy, soft dough begins to pull away from the sides of your mixing bowl. If the dough feels overly sticky, you can add one or two additional tablespoons of flour, but keep in mind that a soft and slightly tacky dough produces the absolute fluffiest bread.
Kneading the Soft Dough
Lightly dust your clean kitchen counter or cutting board with a small pinch of extra flour. Turn the shaggy dough out onto the flour covered surface. Use the palms of your clean hands to push the dough forward, then fold it back over itself in a smooth rhythm. Continue kneading this soft dough continuously for about eight to ten minutes until it turns silky, elastic, and smooth. The dough should feel very supple under your hands and spring back gently when you press it with your finger. Try not to add too much extra flour during kneading because excess flour will make your final bread heavy and dense instead of light and pillowy.
Allowing the First Dough Rise
Take a clean bowl and lightly coat the inner bottom and sides with a few drops of olive oil to prevent sticking. Place your freshly kneaded ball of dough into the oiled bowl and turn it around once so the entire top surface is lightly coated in oil. Cover the top of the bowl tightly with a piece of plastic wrap or a clean damp kitchen towel to lock in moisture. Place the covered bowl in a warm, draft free spot in your kitchen, such as inside an oven that is turned off. Let the dough rest undisturbed for about one hour or until it doubles in total physical size.
Dividing and Shaping the Portions
Once your dough has risen to twice its original size, gently press your fist into the center of the dough to release the accumulated air bubbles. Transfer the relaxed dough back onto a clean counter that is very lightly dusted with flour. Use a sharp knife or a bench scraper to divide the large piece of dough into eight equal size portions. Roll each piece between your hands to create a smooth, round ball shape. Place these dough balls onto a baking tray, cover them loosely with a damp towel, and let them rest for fifteen minutes so the gluten relaxes, which makes rolling them out much easier.
Rolling Out the Flatbreads
Take one rested dough ball while keeping the remaining dough balls covered under the towel so they do not dry out. Place the single dough ball on your lightly floured counter and press it flat with your fingers. Use a wooden rolling pin to gently roll the dough into a smooth round circle that is roughly seven inches across and about one quarter of an inch thick. Be careful not to roll the bread too thin because a slightly thick round shape is essential to achieve that signature soft interior pocket during the cooking stage.
Cooking on the Stove Skillet
Place a heavy cast iron skillet, nonstick pan, or traditional griddle onto your stove over medium heat. Allow the skillet to heat up thoroughly for a few minutes before adding any dough because a hot pan is the secret to getting a great rise and delicious brown spots. Place one rolled flatbread directly onto the dry, hot pan surface without adding any cooking oil. Cook the bottom side for about one to two minutes until small air bubbles begin to form on top of the dough. Flip the bread over using a spatula and cook the second side for another two minutes until you see beautiful light brown spots develop. Flip the bread once more and watch as it puffs up wonderfully like a round pillow. Cook for another thirty seconds to ensure the center is completely done, then transfer the hot bread to a clean plate.
Brushing and Serving Hot
As soon as you remove the cooked bread from the hot skillet, brush the top surface generously with melted butter using a pastry brush. Sprinkle a small pinch of freshly chopped parsley over the warm butter if you like extra flavor and visual appeal. Stack the cooked flatbreads on top of each other on a plate and cover them with a clean kitchen towel. Stacking the warm breads together helps them trap their own natural steam, which keeps every piece incredibly soft, flexible, and warm until you are ready to eat them at your dining table.
Why This Recipe Is Special
This traditional recipe holds a truly unique status in the world of baking because it perfectly balances ancient cooking wisdom with pure simplicity. One of the primary reasons this flatbread stands out is its remarkable ability to achieve an airy interior without needing any fancy bakery equipment or special high heat ovens. The combination of milk and yogurt in the liquid base introduces natural lactic acid that works alongside the yeast. This process creates a remarkably soft crumb structure that stays fresh much longer than breads made solely with water and flour.
From a health and wellness perspective, making this recipe at home gives your body clean, easily digestible fuel without unnecessary chemicals. Many commercial bread products found on grocery store shelves contain strong artificial conditioners, high fructose corn syrup, and harsh preservatives designed to extend shelf life for months. In sharp contrast, this homemade version utilizes simple kitchen ingredients that your body can digest naturally and comfortably. The yeast fermenting process breaks down complex starches in the flour, making the nutrients more accessible and far easier on your stomach, which helps prevent unpleasant digestive heaviness after eating.
The overall taste experience of this classic bread is another reason why it remains famous across many cultures. Every single bite delivers a wonderful contrast between the slightly crispy outer skin and the cloud like soft interior. The yogurt adds a subtle, pleasant tangy note that balances the rich taste of warm butter and natural wheat flour. Because the bread is cooked dry on a scorching skillet, it develops rustic charred spots that provide a delightful smoky note that you simply cannot replicate in a standard baking oven. It is a true culinary masterpiece that brings immense comfort to your body and mind.
Extra Tips for Better Taste
To elevate the flavor of your flatbread to professional culinary levels, consider experimenting with simple yet creative ingredient additions. One incredible trick is to mix minced fresh garlic, crushed red pepper flakes, and dried oregano directly into your melted butter before brushing it onto the hot bread. As the hot butter touches the freshly cooked bread, the garlic cooks slightly in the residual heat, releasing an amazing aroma that elevates the humble flatbread into an addictive gourmet treat.
Another fantastic technique involves stuffing the dough before cooking to create a savory filled bread experience. After dividing your dough into portions, flatten a single ball into a small disk and place a generous handful of crumbled feta cheese, shredded mozzarella, and fresh spinach directly in the center. Pull the edges of the dough up over the filling and pinch them tightly together to seal the ingredients inside. Gently roll the filled dough ball out with your rolling pin and cook it in your skillet as usual for a rich, gooey melted cheese center.
Managing your cooking temperature is also vital for reaching peak flavor and ideal texture. If your skillet is not hot enough, your dough will dry out and turn tough before it has a chance to puff up properly. On the flip side, if your skillet is smoking hot, the outside will burn while the dough inside remains raw and pasty. Aim for a consistent medium heat setting and test the pan temperature with a tiny scrap of dough first. When you hear a gentle sizzle and see small bubbles forming within ninety seconds, your skillet temperature is perfectly dialed in.
Storage techniques can also help you maintain peak freshness for days after baking your batch. If you have extra flatbreads left over after mealtime, allow them to cool down completely to room temperature on a wire cooling rack. Wrap the cooled flatbreads tightly in plastic wrap or seal them inside a reusable freezer bag. You can keep them at room temperature for up to two days or freeze them for up to three months. To reheat frozen flatbreads, simply pop them directly into a hot dry skillet for one minute on each side to restore their original soft, pillowy texture.
Nutrition Details
Here is the approximate nutritional breakdown for this traditional recipe, calculated per individual serving piece based on an eight serving batch:
| Nutritional Component | Value Per Serving |
| Total Calories | 260 kcal |
| Carbohydrates | 44 grams |
| Dietary Fiber | 2 grams |
| Sugars | 3 grams |
| Protein | 8 grams |
| Total Fat | 6 grams |
| Saturated Fat | 3 grams |
| Trans Fat | 0 grams |
| Cholesterol | 10 milligrams |
| Sodium | 310 milligrams |
| Potassium | 140 milligrams |
| Calcium | 50 milligrams |
| Iron | 2.5 milligrams |
Final Thoughts
Baking this traditional pan bread at home is a deeply satisfying culinary experience that brings comfort, great taste, and healthy eating into your daily routine. With just a handful of simple ingredients and a basic stove skillet, you can create rustic flatbreads that rival those made in authentic village bakeries. The soft, pillowy texture and delicate flavor make these flatbreads a welcome addition to breakfast, lunch, or dinner. Once you taste a warm piece freshly brushed with butter, you will realize how easy and rewarding homemade bread making can truly be. Enjoy sharing this timeless recipe with your family and friends around your dinner table.
Disclaimer
Everyone has a unique body with distinct dietary needs, metabolic conditions, and health goals. The nutritional information provided in this article is an estimate intended for general educational and informational purposes only. Actual nutritional values may vary depending on the specific product brands you select, exact measurement techniques, and portion sizes used during cooking. If you have specific medical conditions, food allergies, gluten sensitivities, or specialized dietary requirements, please consult with a qualified health professional or a registered dietitian before making significant changes to your regular daily diet.