Ultimate Guide to Canning Homemade Sauerkraut
Canning homemade sauerkraut is one of the most rewarding kitchen projects you can ever take on at home. This traditional preservation method turns simple raw cabbage and salt into a tangy, crunchy, and flavor packed staple that lasts for months on your pantry shelves. When you learn how to make and preserve your own sauerkraut from scratch, you take full control over what goes into your food, completely eliminating unnecessary chemical additives, artificial preservatives, or excessive sodium often found in commercial store bought cans. The basic process relies on natural lacto fermentation, where beneficial bacteria naturally present on the cabbage leaves consume the natural sugars and turn them into lactic acid. This acid creates a preserved environment that keeps the cabbage fresh, tangy, and wonderfully crisp while preserving its vibrant color and essential nutrients for long term storage.
People all around the world absolutely love homemade sauerkraut because the depth of flavor simply cannot compare to anything you buy at a commercial grocery store. Store bought versions are often quickly processed using harsh vinegar or heavy heat treatments that strip away the complex sour notes and leave the cabbage feeling soft, limp, and lifeless. When you make it yourself at home, you get a clean, bright, and deeply satisfying crunch in every single bite that elevates everyday meals from simple to spectacular. Whether you pile a generous scoop on top of grilled sausages, mix it into warm soups, layer it inside savory sandwiches, or just enjoy a forkful straight from the jar as a quick afternoon snack, the mouthwatering tang instantly makes your taste buds come alive.
There are so many wonderful reasons to start canning your own batch of sauerkraut today, ranging from personal health goals to emotional satisfaction. From a fitness and wellness perspective, fermented cabbage is a true powerhouse for your body, helping support smooth digestion, strong gut health, and a healthy immune system through natural acids and fiber. Beyond the physical health benefits, there is a deep sense of pride and comfort that comes from filling your pantry with bright glass jars of food you prepared with your own hands. It connects you to traditional culinary practices used by generations before us who preserved summer harvests to feed their families during long winter months. Gathering fresh heads of cabbage during peak harvest season when prices are low allows you to save money while creating a delicious supply of nutrient dense food.
Whether you are a seasoned homesteading enthusiast or a complete beginner stepping into home preservation for the very first time, this simple guide will walk you through every single step with complete confidence. You do not need any expensive equipment or advanced culinary skills to succeed with this recipe, just fresh ingredients, clean jars, and a little bit of patience. The transformation from a plain head of green cabbage into a tangy, crunchy condiment feels almost like kitchen magic as the salt draws out natural juices to create its own rich brine. By following clean techniques and proper water bath canning steps, you can safely preserve your hard work so your family can enjoy farm fresh flavor all year long. Let us dive right in and explore how easy and enjoyable canning homemade sauerkraut can be for your home kitchen.
Ingredients You Will Need
To make a standard batch of homemade sauerkraut for canning, you will need the following simple ingredients and key quantities:
-
Fresh green cabbage: 5 pounds or 2.3 kilograms (about 2 large heads of firm cabbage)
-
Pure canning and pickling salt: 3 tablespoons or 45 grams (do not use iodized table salt)
-
Non chlorinated water: As needed if extra brine is required to cover the cabbage
-
Caraway seeds (optional for traditional flavor): 1 tablespoon or 15 grams
-
Juniper berries (optional for earthy flavor): 1 teaspoon or 5 grams
Step by Step Method
Step 1: Cleaning and Preparing the Cabbage
Remove the tough, dirty outer leaves from your heads of cabbage and set two or three clean outer leaves aside for later use. Wash the remaining heads thoroughly under cool running water and pat them dry with a clean towel. Cut each head of cabbage into four equal quarters and slice out the hard inner core from each quarter using a sharp chef knife.
Step 2: Shredding the Cabbage
Shred your cabbage quarters into thin, uniform ribbons using a sharp knife, a stainless steel mandoline, or a food processor fitted with a shredding disc. Aim for thin strips about the thickness of a coin so the salt can extract the juices easily and evenly.
Step 3: Salting and Massaging
Place your shredded cabbage into a very large, clean mixing bowl and sprinkle the three tablespoons of canning salt evenly over the top. If you are using caraway seeds or juniper berries for extra flavor, toss them into the bowl now. Use your clean hands to massage, squeeze, and knead the cabbage firmly for about ten to fifteen minutes. You will quickly notice the cabbage shrinking in volume and releasing a large amount of liquid, which forms your natural brine.
Step 4: Packing the Fermentation Vessel
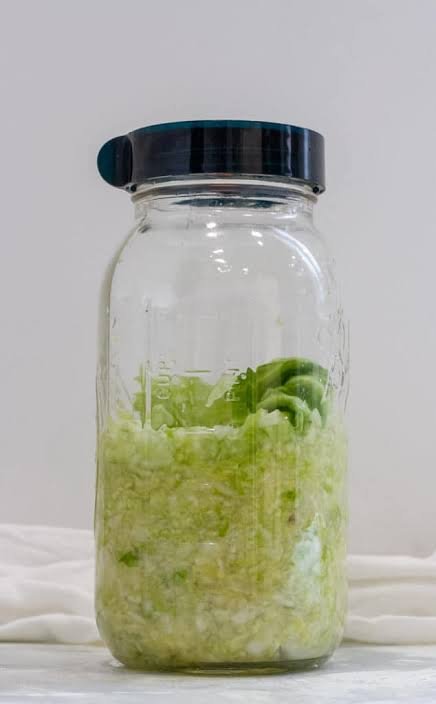
Pack the massaged cabbage firmly into a clean glass crock, large food safe bucket, or wide mouth mason jars. Press the cabbage down hard using your fists or a wooden tamper to eliminate any trapped air pockets and force the natural juices to rise above the top of the cabbage. Place one of the reserved outer leaves on top of the shredded cabbage to keep small pieces down. Weight the cabbage down using a clean fermentation weight or a glass jar filled with water, ensuring all cabbage remains submerged completely under the liquid brine.
Step 5: Fermenting the Cabbage
Cover your container loosely with a clean cloth or airlock lid to keep dust and insects out while allowing gases to escape naturally. Place the container in a cool room where the temperature stays between 65 degrees and 75 degrees Fahrenheit (18 degrees to 24 degrees Celsius). Let the cabbage ferment for three to four weeks. Check on your jar every few days, skimming off any white film that forms on top, and taste test it weekly until it reaches your preferred level of sour tanginess.
Step 6: Preparing Your Canning Equipment
Once fermentation is complete to your liking, get your hot water bath canner ready. Wash your glass mason jars, new lids, and screw bands in hot soapy water and rinse them thoroughly. Fill your large canning pot with water, place your jars inside to keep them warm, and bring the water to a gentle simmer. Keeping your jars warm prevents them from cracking when filled with hot food.
Step 7: Heating the Sauerkraut
Transfer your fermented sauerkraut along with all its natural brine into a large stainless steel stockpot. Heat the sauerkraut slowly over medium heat until it reaches a gentle simmer at roughly 185 degrees Fahrenheit (85 degrees Celsius). Do not let it come to a rolling boil because boiling can soften the cabbage texture too much. Heating the sauerkraut ensures it is hot when packed into warm jars, which is essential for safe hot pack canning.
Step 8: Packing the Jars
Use tongs or a wide mouth funnel to pack the hot sauerkraut tightly into your preheated jars. Ladle the hot liquid brine over the cabbage, leaving exactly one half inch of space (headspace) between the top of the liquid and the top rim of the jar. Run a clean plastic spatula or bubble remover tool down the inside edges of the jar to release any trapped air bubbles, and add extra hot brine if needed to maintain that one half inch of space.
Step 9: Sealing and Water Bath Processing
Wipe the rims of your filled jars with a clean, damp paper towel to remove any food particles or salt residue that might prevent a proper seal. Place a flat lid centered on top of each jar and screw the metal band down until it is fingertip tight. Lower the filled jars carefully into your hot water bath canner, making sure the water level covers the jar tops by at least one to two inches. Place the lid on the pot, bring the water to a full rolling boil, and process pint jars for 15 minutes or quart jars for 20 minutes (adjust processing times for higher altitudes if necessary).
Step 10: Cooling and Storing
When the processing time is finished, turn off the heat, remove the pot lid, and let the jars sit in the hot water for five minutes. Use a jar lifter to remove the jars carefully and place them upright onto a thick towel on your kitchen counter, leaving space between jars. Let them cool undisturbed for twelve to twenty four hours. Listen for the satisfying popping sound that indicates a proper vacuum seal. Test each seal by pressing down on the middle of the lid; if it does not flex up and down, your jar is safely sealed and ready for long term shelf storage in a cool, dark pantry.
Why This Recipe Is Special
This homemade sauerkraut recipe is exceptionally special because it brings traditional food art back into your modern kitchen while using just two humble, inexpensive ingredients. By relying on natural fermentation followed by safe home canning methods, you preserve real food at its peak flavor without relying on artificial chemicals, high fructose corn syrup, or synthetic preservatives. Making your own batches allows you to adjust the salt, crunch, and fermentation time to create a customized flavor profile that perfectly matches your personal taste preferences.
From a nutrition standpoint, cabbage is naturally low in calories while offering a rich source of essential dietary fiber, Vitamin C, and Vitamin K. The natural fermentation process breaks down tough plant sugars, making the cabbage far easier for your stomach to digest while producing natural organic acids. Even though water bath heat processing reduces live probiotic cultures compared to raw unpasteurized sauerkraut, the preserved fiber, essential vitamins, organic acids, and pure natural ingredients make this canned version a remarkably wholesome addition to your daily diet.
Furthermore, this recipe provides exceptional economic value for budget conscious households. Buying raw cabbage in bulk during peak season costs very little money, yet yields high quality canned jars that would cost significantly more at specialty grocery stores. Having a wall of beautiful sealed jars resting in your pantry gives you quick access to flavorful, nutritious side dishes every day of the week without any last minute prep work.
Extra Tips for Better Taste
-
Always choose heavy, tight, dense heads of fresh cabbage for the best crunch and highest natural moisture content.
-
Avoid using iodized table salt because the iodine and anti caking agents can make your brine cloudy and darken the cabbage color. Use pure canning salt, kosher salt, or sea salt instead.
-
Keep all your cutting boards, knives, bowls, and hands thoroughly clean during the salting step to encourage friendly lactobacilli to flourish.
-
For a colorful variation, try mixing half red cabbage and half green cabbage together to create a gorgeous pink tinted sauerkraut batch.
-
Add thin slices of fresh tart apples, fresh garlic cloves, or shredded carrots during the massaged salting stage to introduce subtle layers of natural sweetness and aroma.
-
If your fresh cabbage does not release enough natural liquid to cover itself completely after fifteen minutes of firm massaging, make a quick backup brine by dissolving one tablespoon of canning salt in four cups of non chlorinated water.
-
Store your sealed canned jars in a dark, cool spot away from direct sunlight to preserve the pale golden color and crisp texture for up to a full year.
Final Thoughts
Canning your own homemade sauerkraut is a wonderfully satisfying project that fills your home with delicious scents and your pantry with wholesome, nutrient rich jars. It offers a simple way to practice home food preservation, save money on your grocery bills, and bring unforgettable homemade flavor to your family meal table. Once you experience the clean crunch and delightful tang of your own preserved sauerkraut, you will never want to go back to plain commercial options again. Grab a couple heads of fresh cabbage, fire up your canner, and enjoy every single step of this simple kitchen tradition.
Nutrition Details
Here is the estimated nutrition information for one serving of canned homemade sauerkraut, based on a standard serving size of one quarter cup (about 30 grams):
| Nutrient | Amount Per Serving |
| Calories | 6 kcal |
| Total Fat | 0 grams |
| Saturated Fat | 0 grams |
| Trans Fat | 0 grams |
| Cholesterol | 0 milligrams |
| Sodium | 220 milligrams |
| Total Carbohydrate | 1.4 grams |
| Dietary Fiber | 0.7 grams |
| Total Sugars | 0.5 grams |
| Protein | 0.3 grams |
| Calcium | 9 milligrams |
| Iron | 0.1 milligrams |
| Potassium | 50 milligrams |
Disclaimer
Please keep in mind that individual health conditions, dietary needs, and body responses vary from person to person. The nutrition information provided above is an estimated calculation based on standard ingredient values and may change depending on specific cabbage varieties, salt brands, or length of fermentation. When preserving food at home, always follow clean hygienic practices and validated altitude adjustments for safe water bath canning. If you have severe sodium restrictions, high blood pressure, or specific digestive health concerns, please consult a qualified medical professional or registered dietitian before adding new preserved foods to your daily routine.