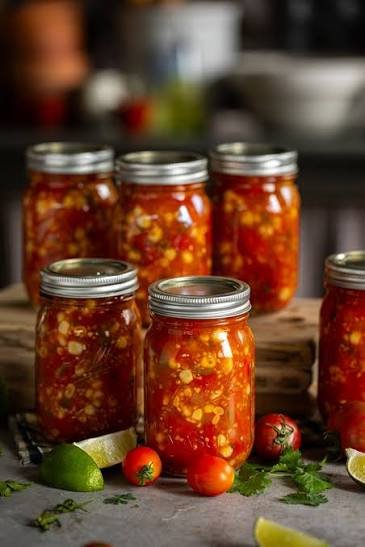
Canning homemade salsa soup is one of the most rewarding kitchen projects you can undertake because it combines the vibrant freshness of garden vegetables with the cozy comfort of a warm meal. This unique recipe transforms ripe tomatoes, zesty peppers, sweet onions, aromatic garlic, and traditional Mexican spices into a rich broth that can be preserved on your pantry shelf for up to a whole year. Unlike plain canned tomatoes or traditional thick salsa, salsa soup is specially crafted to have the perfect liquid balance, making it ready to heat and eat straight from the jar whenever you need a quick dinner. Imagine opening your pantry on a cold rainy day and pulling out a jar filled with the bright taste of summer sunshine preserved at its absolute peak. Preparing this meal in advance gives you complete control over every single ingredient that goes into your body while saving you money and time.
People around the world absolutely fall in love with this recipe because it brings an incredible explosion of authentic flavor without relying on artificial preservatives, excess sodium, or unwanted hidden sugars. Many store bought canned soups are loaded with chemical additives, heavy thickeners, and stale vegetable fragments that lose their color and texture sitting on store shelves for long periods. Home cooks appreciate that this canned salsa soup stays crisp, colorful, and naturally fragrant throughout its long shelf life because every ingredient is processed fresh. It is also an amazingly versatile pantry staple that works well as a standalone soup, a flavorful base for chicken tortilla stew, a simmering liquid for rice, or even a spicy marinade for grilled meats. The immense feeling of satisfaction you get when you hear the gentle popping sound of home canning lids sealing tightly on your counter is something every food lover should experience at least once.
There are so many wonderful emotional, practical, and health centered reasons to start preserving your own homemade salsa soup today. Emotionally, cooking a big batch of rich soup from scratch fills your whole home with an inviting, spicy aroma that instantly brings family members together into the kitchen with wide smiles and hungry appetites. From a fitness standpoint, this soup is naturally low in calories, high in healthy fiber, packed with beneficial vitamins like vitamin C and lycopene, and entirely fat free if you choose not to add oil. It fits effortlessly into almost any dietary lifestyle including vegan, vegetarian, gluten free, low carb, and dairy free eating plans. Whether you want to preserve an abundant backyard garden harvest, prepare healthy meal prep options for busy weeknights, or gift beautiful homemade jars to loved ones during the holidays, this preserves recipe meets every single need with grace and unmatched taste.
Learning the simple art of safe home preservation gives you total independence over your family food supply and creates a wonderful sense of confidence in your cooking abilities. Anyone can master this easy process even if you have never handled a glass canning jar or boiled water on a stovetop before in your life. With simple clear instructions, common kitchen ingredients, and basic safety precautions, canning homemade salsa soup becomes a fun weekend activity rather than an overwhelming chore. By preserving fresh peak season produce at its natural price point, you save significant amounts of money compared to buying premium gourmet canned goods at high end grocery stores. Every spoonful delivers high quality nutrition, crisp natural vegetable textures, and deep comforting Mexican inspired warmth that nourishes your body and brightens your mood during any season of the year.
Ingredients You Will Need
To make a large batch of delicious homemade salsa soup that yields approximately six to eight quart jars, gather the following fresh vegetables, spices, and safe acidic preserving liquids:
Ten pounds of fresh ripe red tomatoes, peeled, cored, and finely chopped
Three large yellow onions, peeled and finely diced
Four large bell peppers, mix of green and red, seeded and chopped
Six small jalapeño peppers, seeded and finely minced for mild heat
One full cup of fresh cilantro leaves, washed and chopped finely
Ten full cloves of fresh garlic, peeled and minced extremely well
Two cups of fresh or frozen corn kernels for sweet flavor and texture
Two cups of cooked black beans, rinsed thoroughly and drained well
One cup of freshly squeezed lime juice for safe acidity and tang
One cup of white distilled vinegar with five percent acidity rating
Two tablespoons of fine canning salt or natural sea salt
Two tablespoons of ground cumin powder for warm earthy aroma
One tablespoon of dried oregano leaves crushed between your fingers
One tablespoon of mild chili powder for rich natural color
One teaspoon of freshly cracked black pepper for background warmth
One teaspoon of crushed red pepper flakes for optional extra spice
Four cups of low sodium vegetable broth or plain filtered water
Step by Step Method
Step One: Preparing Your Equipment
Begin by thoroughly washing all of your glass canning jars, metal bands, and brand new canning lids in warm soapy water. Rinse them completely under clean running tap water to remove any lingering soap residue. Place your clean jars into a large water bath canner filled with hot water and keep them warm over low heat so they do not crack when filled with hot soup later. Place your clean flat metal lids into a small pot of hot water on low heat to soften the rubber sealing rings. Make sure your workspace is clean, clear of clutter, and well organized with heat resistant pads ready to receive hot glass jars.
Step Two: Prepping the Fresh Vegetables
Wash all your fresh produce under cool running water. To peel your fresh tomatoes easily, submerge them in a pot of rolling boiling water for about forty five seconds until their skins begin to split. Immediately remove them with a slotted spoon and plunge them into a large bowl of ice cold water. The skins will slide right off smoothly without wasting any delicious tomato flesh. Core the peeled tomatoes, remove excess seeds if you prefer a smoother texture, and chop them into uniform bite sized pieces. Dice your yellow onions, bell peppers, jalapeño peppers, and garlic cloves with care so all pieces cook evenly.
Step Three: Cooking the Salsa Soup Base
In a very large heavy bottomed stockpot, combine the chopped tomatoes, diced onions, chopped bell peppers, minced jalapeño peppers, and minced garlic. Pour in the freshly squeezed lime juice, white distilled vinegar, and low sodium vegetable broth or filtered water. Stir the liquid thoroughly to ensure all ingredients are evenly coated. Turn your stove heat to medium high and bring the mixture to a full rolling boil, stirring frequently with a long wooden spoon so nothing sticks or burns on the bottom of your pot.
Step Four: Adding Spices and Vegetables
Once the tomato liquid comes to a full boil, turn the heat down to medium low so the soup maintains a gentle steady simmer. Stir in the chopped corn kernels, rinsed black beans, finely chopped fresh cilantro, canning salt, ground cumin, dried oregano, chili powder, black pepper, and optional red pepper flakes. Allow the entire soup mixture to simmer uncovered for roughly twenty minutes. This brief cooking period allows all the wonderful natural spices to blend together, softens the crisp vegetables slightly, and ensures the soup becomes hot all the way through before entering the jars.
Step Five: Filling the Canning Jars
Carefully remove one hot glass jar from your canner using a sturdy jar lifter tool and place it upright on a clean kitchen towel laid out on your counter. Place a wide mouth canning funnel into the top opening of the jar. Use a large metal ladle to scoop the hot salsa soup directly into the warm jar, distributing solids and liquid evenly. Leave exactly one inch of empty space, known as headspace, between the top surface of the soup and the very top edge of the glass rim. This empty space is critical because it allows the food to expand during heating without breaking the vacuum seal.
Step Six: Removing Air Bubbles and Cleaning Rims
Insert a clean plastic bubble remover tool or a smooth silicone spatula down into the inside walls of the filled jar. Gently move the tool around the edges to release any hidden trapped air bubbles that could spoil the soup over time. Measure your headspace again and add a small spoonful of hot broth if needed to maintain that exact one inch space. Take a clean damp paper towel and wipe the top glass rim of the jar thoroughly. Removing sticky soup drips, seeds, or oil from the glass rim ensures a completely clean surface for the metal lid to seal against tightly.
Step Seven: Securing Lids and Processing Jars
Place a warmed flat metal lid directly onto the clean center of the glass jar rim. Screw a metal screw band over the lid until it is fingertips tight, meaning you turn it gently until you feel resistance without forcing it down too hard. Use your jar lifter to place the filled jar back into your large water bath canner. Repeat this process for all remaining jars. Ensure the water level in your canner covers the tops of all jars by at least one to two inches. Cover the canner with its lid and bring the water to a full rolling boil. Process quart jars in boiling water for twenty five full minutes, adjusting time for high altitudes if necessary.
Step Eight: Cooling and Testing the Seals
When the processing time is complete, turn off your stove heat and carefully remove the canner lid away from your face to avoid steam burns. Let the jars sit in the hot water for five minutes to cool down slightly. Use your jar lifter to remove each jar carefully, keeping them perfectly upright without tilting them. Place the hot jars onto a thick towel on your counter, leaving two inches of space between jars for good airflow. Allow them to cool undisturbed for twelve to twenty four hours. As they cool, you will hear delightful metallic popping sounds indicating a successful airtight seal. Check seals by pressing the center of each metal lid. Sealed lids stay firm and flat, while unsealed lids bounce up and down. Store sealed jars in a cool, dark pantry.
Why This Recipe Is Special
This homemade canned salsa soup is exceptionally special because it offers an incredible balance between rich culinary tradition, unbeatable nutritional value, and practical kitchen convenience. Most store bought canned soups contain excessive amounts of salt, processed palm oils, modified corn starches, and artificial taste enhancers that coat your tongue and dull the true flavor of real food. This recipe relies exclusively on fresh garden vegetables, fragrant spices, and natural acids to build deep complex layers of authentic Mexican taste. Every single spoon provides bright citrus notes from fresh lime juice, earthy warmth from cumin, garlic, and cilantro, and sweet juicy bursts from fresh tomatoes and corn kernels.
From a health perspective, this soup is a absolute nutritional powerhouse packed into a low calorie comfort food. Fresh tomatoes are famous for containing rich amounts of lycopene, a potent antioxidant that supports heart wellness and protects cells throughout your body. Peppers deliver massive doses of natural vitamin C, while black beans contribute clean plant based protein and digestive friendly dietary fiber that keeps you feeling satisfied for hours. Because you prepare this recipe yourself from whole ingredients without adding saturated fats, flour, or heavy cream, it remains exceptionally light on your digestive system while nourishing your body with clean vitality.
Another key feature that makes this preserving project stand out is its amazing culinary versatility in everyday home cooking. While it tastes fantastic enjoyed as a warm classic soup straight out of the jar, it can also be transformed into dozens of distinct meals with minimal effort. You can use it as a flavorful poaching liquid for boneless chicken breasts, stir it into cooked brown rice for an instant Mexican side dish, or blend it smooth to serve as an sauce for enchiladas. Having several ready to eat jars sitting quietly on your pantry shelf means you always have a healthy homemade fast food alternative ready on busy nights when you have no energy to cook from scratch.
Extra Tips for Better Taste
To elevate your canned salsa soup from great to truly extraordinary, consider roasting your fresh vegetables before adding them to the cooking pot. Placing your whole tomatoes, split bell peppers, sliced onions, and jalapeños under a hot oven broiler for ten minutes until their skins darken slightly adds a gorgeous smoky aroma and caramelizes their natural sugars. This simple extra step adds amazing depth of flavor that mimics authentic open flame traditional cooking. You can also experiment with using different pepper varieties such as roasted poblano peppers for mild smoky tones or serrano peppers for sharp vibrant spice levels depending on your personal heat preference.
For an even richer broth experience, you can customize your serving bowls right before eating rather than during the canning process. When you open a preserved jar to heat on your stove, consider tossing in fresh toppings like diced creamy avocado, a sprinkle of sharp cotija cheese, crisp baked tortilla strip chips, or a dollop of fresh sour cream. Adding a fresh squeeze of bright lime juice right before serving instantly wakes up all the stored spices and makes the soup taste like you sliced every vegetable just two minutes ago. Remember to keep all dairy, fats, and thickeners like cornstarch out of the initial canning jar because those ingredients are not safe for standard home preservation canning methods.
Another fun culinary trick for maximizing flavor is using fresh whole spices instead of pre ground pantry powders whenever possible. Toasting whole cumin seeds in a dry hot skillet for thirty seconds until fragrant, then grinding them fresh in a spice grinder releases natural volatile oils that produce a far superior aroma compared to older pre packaged spices. Additionally, using a mixture of colorful heirloom tomatoes such as yellow pear, dark cherokee purple, or sweet red romas gives your soup a lovely complex color and a natural balanced sweetness without needing to add refined sugar to mask acidic tones.
Final Thoughts
Taking the time to preserve your own homemade salsa soup is a truly fulfilling kitchen experience that connects you directly to wholesome ingredients and traditional culinary skills. It brings immense joy to know that you can create healthy, delicious, shelf stable meals with your own hands using simple affordable produce. Every step of the process, from selecting crisp colorful vegetables at your local market to listening for that rewarding popping sound on your counter, offers a wonderful sense of accomplishment. Share a jar with a neighbor, stock your pantry for cold weather days, and enjoy the delicious peace of mind that comes with knowing exactly what goes into your daily food. Happy canning to you and your family!
Nutrition Details
Below is the estimated nutritional breakdown per single serving size of approximately one cup of cooked salsa soup:
| Nutritional Component | Amount Per Serving |
| Total Calories | 115 kcal |
| Carbohydrates | 22 grams |
| Dietary Fiber | 5 grams |
| Natural Sugars | 7 grams |
| Protein | 5 grams |
| Total Fat | 0.5 grams |
| Saturated Fat | 0 grams |
| Cholesterol | 0 milligrams |
| Sodium | 480 milligrams |
| Potassium | 520 milligrams |
| Vitamin C | 65 percent daily value |
| Vitamin A | 25 percent daily value |
| Calcium | 45 milligrams |
| Iron | 2.1 milligrams |
Disclaimer
This article is written purely for educational, informational, and home cooking guidance purposes. Every individual human body reacts differently to various foods, spices, and dietary changes. Dietary needs, food sensitivities, sodium limits, and caloric requirements vary greatly from person to person based on age, overall physical activity level, and specific medical conditions. Always ensure you follow proper safe home canning guidelines set by official agricultural extensions to prevent food contamination or spoilage. If you have specific health concerns, chronic conditions, or unique nutritional requirements, please consult a qualified healthcare professional or certified registered dietitian before making significant changes to your diet.