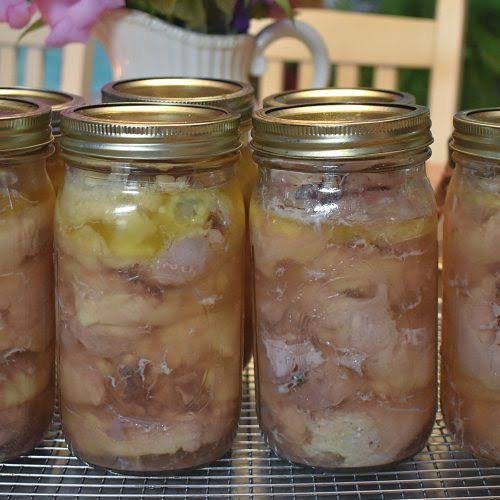
Canning chicken breast at home is one of the most useful skills you can learn if you want to save time and money in your kitchen every single day. This process involves taking fresh chicken breast meat, preparing it carefully, placing it into glass canning jars, and preserving it under heat and pressure so that it stays safe and delicious on your pantry shelf for a very long time. Many people think that home canning is difficult or scary, but once you understand the basic steps, it becomes a simple routine that gives you total control over what your family eats. When you preserve your own meat, you never have to worry about running out of protein when you are busy or tired after a long day of work. You can open a jar of homemade preserved meat, warm it up, and have a healthy meal ready in just a few minutes without ordering expensive takeout food.
People all over the world love home preserved chicken breast because the texture and flavor are completely amazing compared to store bought cans. Commercial canned meat often contains excess sodium, strange chemical preservatives, and a watery texture that lacks real flavor, whereas your home canned version retains a rich savory taste and tender texture. It is incredibly soft, moist, and easily breaks apart with a fork, which makes it perfect for quick lunches, busy weeknight dinners, or emergency food storage supply bins. Home cooks also love how much money they can save by purchasing fresh chicken in large bulk packages when it goes on sale at the grocery store and preserving it immediately. Instead of letting meat sit in the freezer where it might suffer from freezer burn or take up precious space, canning keeps your food shelf stable at room temperature for months or even years.
There are so many wonderful emotional, practical, and health reasons to make your own preserved chicken jars on a regular weekend afternoon. Emotionally, having a pantry stocked full of beautiful glass jars filled with real wholesome food gives you a deep sense of security, comfort, and pride in your self sufficiency. From a fitness perspective, lean chicken breast is packed with pure muscle building protein and very little fat, making it an ideal staple for anyone following a low carb, high protein, or clean eating lifestyle. When you are rushing home after a tough workout at the gym, having ready to eat healthy protein waiting in your pantry keeps you on track with your fitness goals instead of making poor eating choices. It also saves you during cold winter storms or power outages when cooking from scratch becomes difficult or impossible.
Learning how to safely preserve poultry at home opens up endless meal possibilities for your weekly dinner menu without any added stress or messy clean up. You can quickly turn a single glass jar into a warm pot of chicken noodle soup, a batch of spicy chicken tacos, a fresh green salad topped with shredded meat, or a creamy chicken salad sandwich filler. The natural juices that form inside the jar during the pressure process create a rich brothy liquid that adds extra depth and savory taste to any recipe you create. It feels deeply satisfying to cook for your loved ones using simple ingredients that you preserved with your own hands. By mastering this easy food preservation technique, you build a stronger connection to your food and create a healthier, more organized kitchen environment for your whole household.
Ingredients You Will Need
To prepare this preserved meat safely and easily at home, gather the following ingredients and basic pantry staples before you begin your cooking session.
- 5 pounds fresh boneless and skinless chicken breasts
- 2 teaspoons pure canning salt or kosher salt without iodine
- 4 cups clean filtered water or hot unsalted chicken broth
- 2 tablespoons fresh lemon juice for washing the meat
- 1 teaspoon black pepper optional for added flavor
- 1 teaspoon garlic powder optional for extra savory depth
- 1 teaspoon onion powder optional for subtle sweet aromatic flavor
Step by Step Method
Follow these clear and detailed steps carefully to ensure your meat is safely preserved, delicious, and shelf stable for your pantry shelves.
Preparing the Equipment and Jars
First, clean your working area thoroughly and wash your pint size canning jars, new lids, and metal rings in warm soapy water. Rinse them completely with clean water to remove any soap residue. Place the clean jars into a large pot filled with hot water to keep them warm until you are ready to pack them with meat. Keeping your jars warm prevents the glass from cracking when hot liquid or meat is placed inside them. Check the rims of all your glass jars with your finger to ensure there are no nicks, cracks, or rough edges that could prevent a tight seal later.
Cleaning and Cutting the Meat
Take your fresh chicken breasts and rinse them gently under cold running water. Trim away any excess skin, yellow fat, gristle, or tough connective tissues using a sharp knife, because excess fat can spoil during storage and ruin the seal of your jars. Cut the cleaned meat into uniform cubes or long strips that are about one inch to two inches in size. Keeping the pieces similar in size helps the heat penetrate evenly through all the meat during the pressure preservation process.
Method One Raw Pack Technique
If you choose the raw pack technique, you do not need to add any liquid to the jars beforehand because the meat will release its own natural juices as it cooks under pressure. Fill your warm glass jars tightly with the raw cut chicken pieces, leaving one inch of space between the top of the meat and the rim of the jar. This top space is called headspace, and it is crucial for allowing the food to expand and seal properly. Add half a teaspoon of canning salt to each pint jar if you wish to enhance the flavor, but do not pack the meat so tightly that air cannot circulate.
Method Two Hot Pack Technique
If you choose the hot pack technique, place your cut chicken pieces into a large cooking pot and add just enough water or fresh chicken broth to cover the meat. Bring the pot to a boiling point over medium heat and let it simmer gently for about six minutes until the outside of the meat turns white, though it does not need to be cooked completely through. Fill your warm jars loosely with the hot chicken pieces, leaving one inch of space at the top. Ladle the boiling hot cooking liquid over the meat, keeping that same one inch of space at the top rim of every jar.
Removing Air Bubbles and Cleaning Jar Rims
Take a thin plastic spatula, wooden skewer, or bubble remover tool and gently slide it down along the inside walls of each filled jar. Move it around slightly to release any trapped air bubbles hidden between the meat pieces. Add a little extra hot liquid if the level drops below the one inch line after removing the bubbles. Dip a clean paper towel into plain white vinegar or hot water and wipe the top rim of every glass jar carefully to remove any grease, salt, or bits of meat that could stop the lid from sealing tightly.
Closing the Jars and Preparing the Preserving Pot
Place a clean flat lid on top of each jar rim, making sure the rubber sealing ring faces down against the glass. Screw the metal band over the lid until it is fingertip tight, which means turning it until you feel resistance and then just slightly more without forcing it down too hard. Place your filled jars upright onto the rack inside your pressure preserving pot, which should already contain about two to three inches of warm water mixed with a tablespoon of white vinegar to prevent water spots on the glass.
Preserving under Heat and Pressure
Lock the lid of your pressure preserving pot securely in place according to the instructions from the manufacturer. Turn your stove burner to medium high heat and allow steam to escape continuously from the open vent pipe for ten full minutes to clear out all air from inside the pot. Place your pressure weight over the vent pipe and wait for the pressure gauge to reach eleven pounds of pressure, or ten pounds if you use a weighted gauge system. Once the correct pressure level is reached, set a timer for seventy five minutes for pint jars or ninety minutes for quart jars. Adjust your stove heat carefully throughout the cooking time to maintain a steady pressure reading without letting it drop lower even for a moment.
Cooling and Final Checking
When the timer rings, turn off your stove burner completely and let the preserving pot cool down naturally without touching the weight or opening the lid. Wait until the pressure drops back to zero on its own, which can take forty five minutes to an hour. Remove the weight, wait ten extra minutes, and then open the lid carefully away from your face to avoid steam burns. Use a jar lifter tool to remove the hot jars from the pot and set them onto a thick towel on your kitchen counter. Let the jars sit completely undisturbed for twenty four hours while they cool, listening for the rewarding popping sound that tells you the lids have sealed tight. After twenty four hours, test the center of each lid with your finger to ensure it does not bounce up and down, remove the metal bands, wipe the glass clean, and store your preserved jars in a cool dark pantry.
Why This Recipe Is Special
This home preservation recipe is special because it completely changes how you manage your kitchen, save money, and feed your family healthy food. Unlike mass produced options sold in commercial grocery stores, your homemade preserved poultry contains no chemical preservatives, artificial additives, excess water weight, or hidden sodium compounds. You have complete control over every single ingredient that goes into the glass jar, which means you can tailor the recipe to match low sodium diet plans or personal taste preferences effortlessly.
From a nutritional standpoint, lean breast meat is one of the cleanest sources of dietary protein available. It helps support healthy muscle growth, keeps your metabolic rate strong, and keeps you feeling full and satisfied for longer periods, which aids in weight management goals. Preserving the meat in its own natural juices Locks in essential vitamins and minerals like iron, phosphorus, vitamin B6, and niacin, creating a tender product that retains its nutritional value remarkably well over time.
Additionally, the convenience factor of having fully cooked, tender poultry sitting ready on your shelf cannot be overstated. It slashes your daily meal preparation time down from forty five minutes to under five minutes. You can effortlessly make delicious soups, stews, casseroles, wraps, or salads on your busiest weeknights without thawing frozen meat or washing greasy prep boards and cutting surfaces. It gives you absolute peace of mind knowing that your family has immediate access to wholesome, high quality protein during emergency situations, unexpected guests, or busy schedules.
Extra Tips for Better Taste
- Add fresh herbs like rosemary, thyme, or bay leaves directly into each jar before processing to infuse the meat with deep, aromatic botanical flavors.
- Use fresh chicken broth instead of plain water during the hot pack method to give your Preserved meat a richer color and an intensely savory flavor profile.
- Mix a tiny pinch of smoked paprika or cayenne pepper into the salt mixture if you enjoy a subtle smoky taste or gentle spicy kick in your chicken dishes.
- Always use pure canning salt or pure sea salt rather than regular table salt, because standard table salt contains anti caking agents that make the liquid cloudy.
- Store your sealed jars in a dark room with cool temperatures away from direct sunlight, because heat and light can cause the meat to lose color and flavor over time.
- When opening a jar for dinner, save the rich broth inside to cook rice, quinoa, or vegetable dishes so that no delicious flavor goes to waste.
Final Thoughts
Preserving chicken breast at home is a simple, rewarding, and cost effective skill that empowers you to take complete charge of your meal planning and emergency food reserves. Once you experience the incredible convenience of pulling a jar of moist, flavorful, home preserved meat off your shelf and putting a healthy meal on the table in minutes, you will never want to rely on plain store bought cans again. Give this easy technique a try on your next free weekend, share your delicious results with family and friends, and enjoy the wonderful peace of mind that comes with a beautifully stocked homemade pantry.
Nutrition Details
Here is an estimated breakdown of the nutritional content for this home preserved chicken breast recipe, evaluated both per serving and for the entire cooked batch.
| Nutritional Component | Amount Per Serving One Half Cup | Total Amount For Whole Batch Ten Servings |
| Calories | 140 kcal | 1400 kcal |
| Protein | 26 g | 260 g |
| Total Fat | 3 g | 30 g |
| Saturated Fat | 1 g | 10 g |
| Trans Fat | 0 g | 0 g |
| Cholesterol | 70 mg | 700 mg |
| Sodium | 220 mg | 2200 mg |
| Total Carbohydrates | 0 g | 0 g |
| Dietary Fiber | 0 g | 0 g |
| Sugars | 0 g | 0 g |
| Vitamin D | 0 mcg | 0 mcg |
| Calcium | 15 mg | 150 mg |
| Iron | 1 mg | 10 mg |
| Potassium | 280 mg | 2800 mg |
Disclaimer
Everyone’s body and dietary needs are unique, and individual health results may vary based on your age, physical activity level, and medical history. This recipe and storage guide is provided for general educational and instructional purposes only and should not be taken as professional medical or nutritional advice. Always consult with a qualified healthcare provider or certified dietitian regarding your specific dietary needs or health conditions. Additionally, make sure to strictly follow all current food safety standards and pressure preservation guidelines to prevent foodborne illness and ensure your preserved goods are completely safe to consume.